Thursday, December 13, 2012

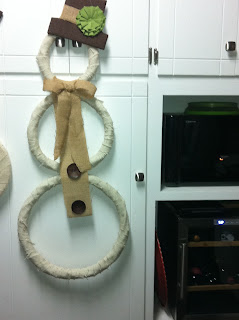
Burlap Snowman

I have to thank my friend Shaila for this idea. It was pretty easy and turned out extremely cute.


Here is what you will need:

-Hot glue gun
-Three rings (small, medium and large)
-Three colors of burlap one yard of the lightest, 1/2 yard of the medium and 1/4 yard of the brown
-2 or 3 embellishments for the scarf(we used buttons and flowers)
-A flower for the hat
-Cardboard to create the hate(not pictured)
-Scissors


First you need to cut the lightest color burlap into strips. These are used to wrap around the rings to create the snowman's body. 


It should look like this when you are done.


Once you wrap all three of the rings you will connect each one with another strip of the burlap.


Now you want to begin attaching the scarf. You will use the medium color burlap. You want to cut two strips. One to tie the bow and one to glue on as the actual scarf. 


Next you want to tie the other strand in a bow and then glue it on top of the scarf you have glued down. 


Now you want to add your embellishments to the scarf. 


Now its time to create the hat. You want to cut a top hat shape out of your cardboard. Then you want to wrap the hat in the brown burlap. Once you have wrapped the hat you want to wrap another strip of the medium color burlap around the hat. Finally you add the flower and glue the entire hat onto the snowman.


You can make these in all sizes. Below is an example of a smaller one that was made.


Saturday, December 8, 2012

Beer Cake

My brother is the HARDEST person in the world to buy a gift for. This Christmas I took an idea I saw on pinterest and added my own twist to it. This is what I came up with...

I used 14 Miller lite cans, three packs of gum, Three packs of cashews, three packs of turtles candy and a gift card to our local liquor store. 

Santa Belt Wrapping

Wasn't sure I was going to be able to make this happen with the glitter wrapping paper, turns out there isn't much I won't use my hot glue gun on! Love it!!

Sunday, December 2, 2012

Ribbon Santa Belt Ornaments

With my obsession I need my tree covered, I couldn't just stop at one type of Santa Belt Ornament. So I did the same concept except this time I filled the inside with curled ribbon.


You will need:

-Clear ornament balls
-Black ribbon
-Black Paint
-Red curling ribbon
-Silver glitter glue/paint
-Hot glue gun(not pictured)
-Scissors
-Q Tip


I started by curling a whole bunch of ribbon and then began placing it inside the ball.


Once the ball was full I replaced the cover.


Same as the glitter ornament I wrapped the ribbon around and hot glued it together.


Next I pained on the belt buckle and the buttons.


And Done!!

Glitter Santa Belt Ornaments

 I have a pretty serious obsession with Santa Belt ornaments so I decided to combine a couple of other peoples ideas together to create this.


 You will need:
-Clear ornament balls
-Red Glitter
-Pledge floor care(will have a blue lid and say "future" on the bottle)
-Black Ribbon
-Q Tips
-Silver Sparkle Glue/paint
-Black Paint
-Cotton Balls(not pictured)
-Envelope(to use as a funnel)
-Hot glue gun(not pictured)


 First thing you need to do is get all of the caps off of the ornaments.


 Next you will put some of the pledge into the ornament(Be sure to pour slowly and not squirt it in too fast, it helps keep the foam to a minimum).


 Slowly swirl the pledge around the ball to coat the entire inside. And then pour the remaining pledge back into the container.


Now you will use your envelope to funnel in the red glitter. Use a generous amount, any extra you will pour back into your envelope.


Swirl the glitter around so it coats the entire ornament. You then want to cover the hole with your finger and shake the glitter to cover the entire top.


Pour the remaining glitter back into the container to reuse on your next ornaments. 


 Put the caps back onto the ornaments.


Now you need to wrap the ribbon around the ornament and hot glue it together.


Next I used the silver glitter glue to paint on the buckle.


I then used the q tip to paint the three buttons onto the ornament.


Finally I tucked a small portion of the cotton ball into the ornament topper to create the beard.


Monday, November 26, 2012

DIY Coasters

This is one set of the finished product. I have tried several different ideas for DIY coasters and this is my first successful go at it. Here is what you need:

-4x4 tiles(I got mine for $0.13 a piece at Home Depot)
-Mod Podge
-Mod podge Applicator(I used a roller bottle which i pictured below and purchased at Hobby Lobby)
-Any type of paper to cover the tile(I used wrapping paper for the Bears coasters and scrap book paper for the second set)
-Felt to cut into squares and glue to the back
-Spray paint clear glossy sealer(not pictured)
-Hot glue gun(not pictured)

I placed a thin layer of the Mod Podge on the tile before placing my 4x4 piece of paper on it(this helps hold it in place while you are coating it).

I then placed the paper on the tile and began putting a layer of Mod Podge on top of the paper, waited 15 minutes and placed another coat. I did this for total of four times. 

I let the tiles dry for about three hours before spraying a layer of the spray sealer. This takes about 30-45 minutes to try.

Lastly I glued a square of felt to the bottom so the coasters do not scratch the table.

Another version with scrap book paper came out like this:


A new holiday Set...